
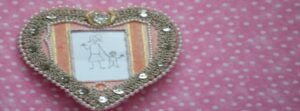
Framed with Love
Materials
- Cardboard
- Scissors
- Decorations such as markers, pearls, sequins
- Glue
- Gemstone
- Ribbon
- Pipe cleaner
Directions
- Cut out four hearts, measuring 4 3⁄4 inches tall by 4 1⁄2 inches wide.
- In the center of one of the hearts, cut out a rectangular shape that is 2 1⁄2 inches tall by 1 1⁄2 inches wide. This will make a space for a photo or small drawing.
- On a second heart, cut a rectangular opening that measures 2 3⁄4 inches tall by 1 3⁄4 inches wide. This area is larger so your photo or small drawing will stay in place. Then, glue together the two hearts with the rectangular shapes. This will be the front of the frame.
- Next, glue together the final two hearts to make the back of the frame. You should now have just two hearts. When both hearts have dried, apply glue near the tip of the heart of the back frame. Then, stick to the front frame heart. Keep glue away from the image area. This will enable you to slip your photo in later.
- Then, decorate your frame using ribbon, upholstery trim, sequins, and craft pearls. Or, simply draw your own design using markers.
- Glue a gemstone to the top of the frame. Then, twist a three-inch piece of ribbon around the gemstone and secure the ends to the back of the frame. This will help keep the frame closed and also make changing the photo easier.
- Once your frame is dry, slide your image through the side of the frame and position it into the area where the rectangle is. Tip: Place the larger rectangle you cut out of the heart onto your photo or small drawing and lightly trace the shape. This will make it easier to cut your image to fit into the heart.
- Finally, glue a pipe cleaner on the back for legs. Bend the pipe cleaner in three places so there are two sections for the legs and a two-inch section to glue to the back of the heart frame.
Craft by: Arts Council Greater Baton Rouge